Appearance
Storage Locations
Track where your physical items are stored with a hierarchical location system. Create locations like rooms, shelves, boxes, and bins, then assign items to know exactly where everything is.
Why Use Storage Locations?
When your collection grows beyond a few items, remembering where everything is stored becomes a challenge. Storage locations let you:
- Know exactly where each item is stored
- Browse items by location instead of by collection
- Organize storage hierarchically (e.g., "House > Living Room > Bookshelf A > Shelf 3")
Creating Storage Locations
- Click the Storage tab in the main navigation
- In the left sidebar, click the + button
- Enter a Location Name (e.g., "Living Room Bookshelf")
- Choose a Location Type to categorize it (building, room, furniture, shelf, drawer, box, bin, or generic)
- Optionally add a Description, Color, Icon, and Photo
- Click Create Location
This creates a top-level location. To create a location inside another one, use the + button next to the parent location in the tree (see below).
Adding a Photo
Each location can have one photo — handy for remembering exactly which shelf or box a location refers to. Add one when creating the location, or later via Edit Location. The photo appears as a small thumbnail next to the location's name; click it to view it full size. To replace or remove the photo, open Edit Location and use the buttons on the photo. Photos can be JPEG, PNG, WebP, or GIF, up to 10 MB, and are only visible to you.
Building a Location Hierarchy
You can nest locations up to 8 levels deep. For example:
- House (building)
- Living Room (room)
- Bookshelf A (furniture)
- Shelf 1 (shelf)
- Shelf 2 (shelf)
- Shelf 3 (shelf)
- Bookshelf A (furniture)
- Garage (room)
- Storage Box 1 (box)
- Storage Box 2 (box)
- Living Room (room)
To create a child location, click the + button next to any location in the tree — the new location is created inside it.
Assigning Items to Locations
Items are assigned to locations from the item editor:
- Open any item by clicking on it
- In the edit view, find the Storage Location dropdown
- Select a location from the tree
- The item is automatically assigned
Browsing Items by Location
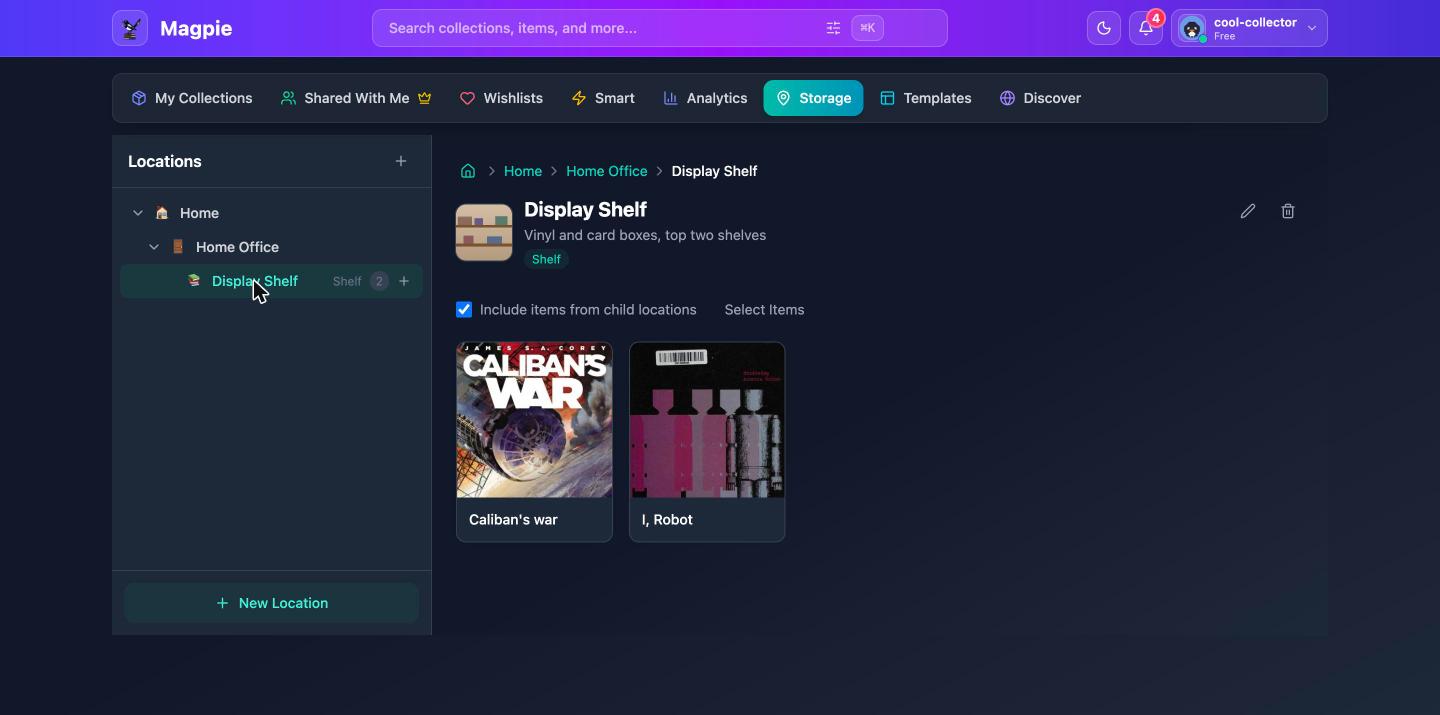
- Click the Storage tab
- Click any location in the left sidebar tree
- The main area shows all items stored at that location
- Toggle Include items from child locations to also see items in nested locations
Viewing an Item's Location
Items with an assigned storage location show a small teal badge with the location name:
- In Grid view, the badge appears below the item's tags
- In List view, the badge appears inline in the item row
Click on the badge or open the item to see the full location path (breadcrumb).
Moving Items Between Locations
- Open the item you want to move
- Change the Storage Location dropdown to the new location
- The item now appears under its new location on the Storage page
Editing and Deleting Locations
Editing a Location
- Go to the Storage tab
- Select the location you want to edit
- Click the Edit button
- Update the name, type, description, color, or icon
- Click Save Changes
Deleting a Location
- Select the location you want to delete
- Click the Delete button
- Confirm the deletion
- Any child locations will be moved up to the deleted location's parent
- Items assigned to the deleted location will become unassigned
Limits
- You can create up to 200 storage locations
- Locations can be nested up to 8 levels deep
- Location names can be up to 100 characters
Mobile App
Storage locations are also available on the mobile app:
- Tap the Storage button on the home screen
- Browse the location tree
- Tap any location to see items stored there
- Create new locations with the + button
Related Guides
- Items - Learn about adding and managing items
- Collections - Learn about organizing collections